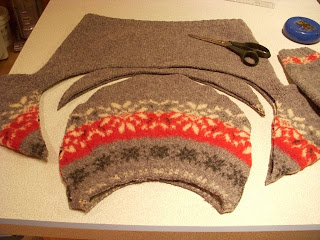
As you can see, there isn't much left of our nice gray sweater after having made it into a hat and a scarf already. I'm determined not to let any of it go to waste, though, and there are still the two sleeves left! Happily for us, these sleeves are rather roomy, and they will make nice warm mittens for Son's man-sized hands.
The first thing I had Son do was put the sleeve on his hand and determine how far down his wrist he wanted the sleeve ribbing to be. The sleeve ribbing would become the wrist ribbing on the mittens. He positioned his hand on a piece of paper with the edge of the paper at the place where he wanted the ribbing to end on his wrist. Then he traced around his hand:
I added a half inch all the way around his outline for comfort, and another half inch for a seam allowance (one inch total all the way around), giving myself a new outline to use as a pattern:
Notice that the pattern doesn't have a distinct thumb piece. That's okay, I'll be cutting on the pencil line between the thumb and hand. You can click the photo to see it larger if you can't see the pencil line. Once the seam has been sewn, I will clip that area right down to the seam to give the thumb separation. I also intend to use the folded top edge of the sleeve - the part opposite the underarm seam - as the outside edge of the mitten. That's why there is no seam allowance or ease added to that side. I cut out the pattern and pinned it to the sleeve, matching the pattern's wrist edge with the sleeve's wrist edge, and the fold line of the pattern with the folded edge of the fabric. Then I cut out the fabric.
Turn the fabric right sides together, and pin it.
I used a three-step zigzag to sew the seam, in order to give it some stretch. Sew the seam and trim the seam allowances, being careful not to cut into your stitches!
Turn the mitten right side out and try it on!
It's a good fit, so go outside and make some snowballs!
See also: The Eddie Bauer Sweater Refashion, Part 1 and
The Eddie Bauer Sweater Refashion, Part 2.


