November 29, 2009

The Eddie Bauer sweater refashion, part 2

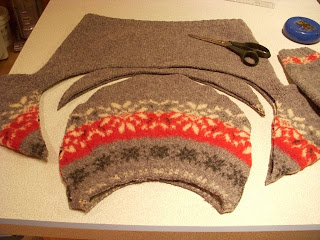
It's time to revisit the remains of the thrift store sweater that was first used to became Son's earflap hat. There's really not that much left, just the tummy part and the two sleeves, but I can get a lot more good out of that old sweater! This time around, I'll be making a keyhole scarf out of the tummy part. (Yes, I took the photo upside down. Sorry.)


Why a keyhole scarf? The main reason is that it doesn't take as much fabric to make one of those as opposed to a long scarf that has to be wrapped around the neck and still be long enough for the weight of the ends to hold the scarf in place. A keyhole scarf has a slit cut in it (the keyhole) that the other end of the scarf is passed through, which keeps the scarf in place snugly against the wearer's neck without a lot of extra length.

I forgot to take a picture of the scarf when I trimmed off the little bit of excess sweater, but I just cut on the dotted line Son drew in for me. That trimmed off the ribbing around the waist, and gave me a piece of fabric about 6" wide. Son asked to have the back of the scarf left a little longer to insure it didn't leave a gap for the wind to blow down the back of his shirts. Which is really a good idea, come to think of it. I cut open the fabric at the side seam (see the dotted line), wrapped it around Son's neck, and determined the place to cut the keyhole slot, and then cut that out, too.


I blanket stitched around the cut edges to match the blanket stitching on the hat. I did that while watching tv, and it didn't take long at all.


Here's Son, wearing the scarf.


And a view of what it looks like in the back:


It will even keep faithful old dogs warm!


This was my favorite part of refashioning this old sweater, and even Husband wants one. I'll have to go back to the thrift store for more old wool sweaters!

Rose Hip Cookies with Tea


As you probably know, there are lots of foods that grow wild in Alaska. Probably the happiest find in the "wild foods" department for us has been rose hips. In my (ahem) former life as an urban housewife, roses were dead-headed when the blossoms faded, so there were no rose hips to speak of, but now I'll never dead-head another rose bush. The hips are too tasty and too versatile to waste.

While I haven't yet made the ever-popular rose hip jelly, I've made my fair share of rose hip tea and cookies. For tea, dry the rose hips whole for a couple of weeks until they're hard and wrinkly. Grind a tablespoon of the dried hips in your coffee or spice grinder, and then steep them in hot water for 5 minutes or more. Strain out the solids and enjoy the fruity-tasting hot tea with a little honey if you like.

Son's preferred use for rose hips is in rose hip cookies. Much like an old-fashioned cake-y gingerbread, they're lovely for dunking in coffee or tea. The recipe I use comes from the book "Collecting and Using Alaska's Wild Berries and Other Wild Products" published by the University of Alaska Fairbanks' Cooperative Extension Service. That is an excellent publication, by the way, and you can order it by clicking on the book title above. The illustrations in the book are covered by copyright, but the recipes do not appear to be. And so, here it is:

Rose Hip Cookies

2 1/2 cups flour
4 teaspoons baking powder
1/2 teaspoon cinnamon
1/2 teaspoon nutmeg
1/4 teaspoon ginger
1/2 teaspoon salt
1 1/4 cups brown sugar
1/2 cup shortening
2 eggs
1 1/2 cups rose hip puree*
1 teaspoon lemon juice
1 cup raisins, optional
1 cup nuts, optional

Sift together the dry ingredients. Set aside. Cream the sugar and shortening, add the eggs, rose hip puree, and lemon juice, and mix thoroughly. Add dry ingredients, raisins, and nuts, and mix well. Drop by tablespoonfuls onto a lightly oiled cookie sheet (I use parchment paper on the cookie sheet and skip the oiling). Bake 15 minutes at 400 degrees. Remove from cookie sheet and cool on wire rack.

I drizzled this batch with some melted white chocolate for a little bit of a change, but you don't have to. They're delicious the way they are.

* To make rose hip puree, combine 4 cups cleaned, soft, ripe rose hips with 2 cups of water. Bring to a boil and simmer for 15 minutes. Press through a sieve to remove seeds and skins. What does not go through the sieve can be simmered again by adding a little water to it. Press through the sieve again, and repeat the process until most of the fruit has gone through the sieve. Discard the seeds and skins. I freeze the puree in one and a half cup portions so whenever I want to make the cookies, all I need to do is thaw it and I'm ready to go.

Pictured are rose hip cookies and rose hip tea in a cup and saucer from Grandma A's collection.


November 21, 2009

The Eddie Bauer sweater refashion, part 1

I found this slightly-felted Eddie Bauer sweater at my local Salvation Army store. It's 85% wool and 15% nylon. Nice and thick, and only $4.75. I think I can make something new out of this...


Son likes gray for his winter outerwear this year, so I thought he'd appreciate a refashion from this sweater until I can get around to knitting him something special. After consulting him and giving it some thought, I think I can get a complete set of hat, scarf and mittens from this one sweater. He said he'd like the hat first.

I threw this sweater (along with some others I bought at Salvation Army), into a washer load of towels, washed it in hot water and then threw it in the dryer so that it could felt up even further than it was when I bought it. It originally measured 23" long and 20" wide, and shrank down to 21" long and 18" wide. It got thicker and sturdier, especially where the red band has extra yarn in the fabric.

That red band with the snowflakes on it was just too pretty to waste, so I decided to make the hat in such a way as to preserve it. I've seen lots of refashions where hats were made from sleeves or from bottoms of sweaters, but I haven't seen one yet where the hat was made from the neckline. So I'm going out a little on a limb here and we'll see where it leads me. First, I had Son try on the sweater upside down, as if the neck ribbing were hat ribbing, to see if I could keep that ribbing on. Nope. Too small by about an inch, so I cut it off, leaving as much fabric at the neckline as I could, just in case I needed it. I can trim it off later if I want to, since the felted fabric won't unravel.


I measured Son's head from front to back, and from the bottom of his ear to the top of his head. Using those measurements as a starting point, I cut out an oversized semi-circle from the sweater (making sure to line up the pattern on both layers), cutting through the front and back at the same time. I now have two pieces of sweater. I got carried away and cut waaaay too big a semi-circle, so I trimmed it a bit. Son and Husband are both, shall we say, cranially endowed. I had to leave enough fabric so that I could cut some off if need be, rather than wish I had more.


I pinned the layers together, wrong sides facing, and making sure that the pattern was lined up.


Then I had Son test-fit it. Basted it together, had him test-fit it again, and basted it again until I had it just the way he wanted it. During this time we discovered that not only was this going to be a really warm wool hat, but it would cover his ears, too! Brownie points to me for deciding to use the neckline, huh?

This is what it looks like finally sewn together. I also sewed a small seam going from front to back at the crown of the hat, to help it conform to Son's head.


All that remains is to blanket stitch the border of the hat to make it look more finished. While I was doing that, Son and Husband went out to chop wood for the stove. I looked out the window and noticed that Son was bare-headed. Can't have that. So I took him the hat as it was, and he wore it for the first time before it was even complete.


Here's an action shot. By the way, I made Husband's hat, too. His is a wool-blend double-knit that took me something like three weeks to finish!


And here's what the hat looks like with the blanket stitching and the flap ties. Not that Son ever intends to actually tie the flaps down, so they're short and purely decorative.


Here's Son on our balcony, overlooking our snowy lake, holding his puppy and wondering when I'm going to get around to making the rest of his refashion outfit!


What would I do differently next time? I'd leave the back a little longer than the front, but since I'm about to make a scarf out of the same sweater fabric, I won't stress over that. I'll just change that little detail for next time!

See also: The Eddie Bauer Sweater Refashion, Part 2 and The Eddie Bauer Sweater Refashion, Part 3.

November 19, 2009

Knitted Dishcloths and Washcloths


The Mt. Redoubt Homemakers' Club is taking part in the annual holiday bazaar the weekend following Thanksgiving, and we have already run out of dishcloths, so I volunteered to make some more. Some of the projects I work on take days or weeks to finish, but dishcloths are deliciously quick and easy. It feels so good to be able to make several in an evening!

Everyone has their own pattern for knitted dishcloths, but I'll give you mine. It's the one my husband's grandmother used for the hundreds of dishcloths she made for everyone through the years.

For two dishcloths, you'll need one ball of 100% cotton yarn (such as Lily's Sugar and Cream) and size 8 needles. Using a long tail cast-on, cast on 4 stitches.

Knit two, yarn over (making an increase), and knit the remaining stitches on the needle.

Repeat this row (making one yarn-over increase per row) until you have 40 stitches on your needle.

Now begin decreasing:
(Knit two stitches together) twice, yarn over, and knit the remaining stitches on the needle.

Repeat this row until you have four stitches on your needle again, and bind off. Weave in ends.

I've seen patterns where the knitters prefer to start with 5 stitches, prefer different sized needles, etc. There's no wrong way. It's not a grand piano, it's something to wash your dishes with, so any and all variations are perfectly fine. In fact, the dishcloth in the photo is a variation of my usual pattern - I only have one stitch, not two, on the outside edge of the yarn-overs. And I think I might like it better that way.

The photo shows an assortment of dishcloths on their way to the holiday bazaar, a bar of my own homemade soap, and a Kraft Cheese Brick box that's been in my family so long I don't remember ever not having it.

November 13, 2009

Hello, and Welcome!

Greetings, fellow crafters! I'm glad to have you tagging along as I indulge my crafting obsessions, and I hope you'll decide to do a few of these projects with me. So get out your craft supplies and see what you have in your stash, because whatever it is you've been hoarding, I'm sure I'll get around to using it eventually!